Docker

Introduction

What is Docker ? :-

Consider that you have a project in which you need to build an application which has multiple dependencies on technologies for Databases, Web Servers, Messaging and Orchestration. Now these technologies will have their own libraries, dependencies, and compatibility issues with the underlying shared OS kernel. Every time you change something in the application or in the technologies used, you need to ensure that the change is supported by the underlying dependencies and this process can sometimes be tedious. This is where Containers come into picture.

Containers are isolated environments which have their own processes, services, N/W interfaces, mounts just like VMs except that they share the same OS kernel. So it is not possible to create a Container with a Windows OS on top of a host with a Linux OS kernel. Docker is currently the most popular container technology. It provides high level tools with several powerful functions for the end user.

Containers vs VMs :-

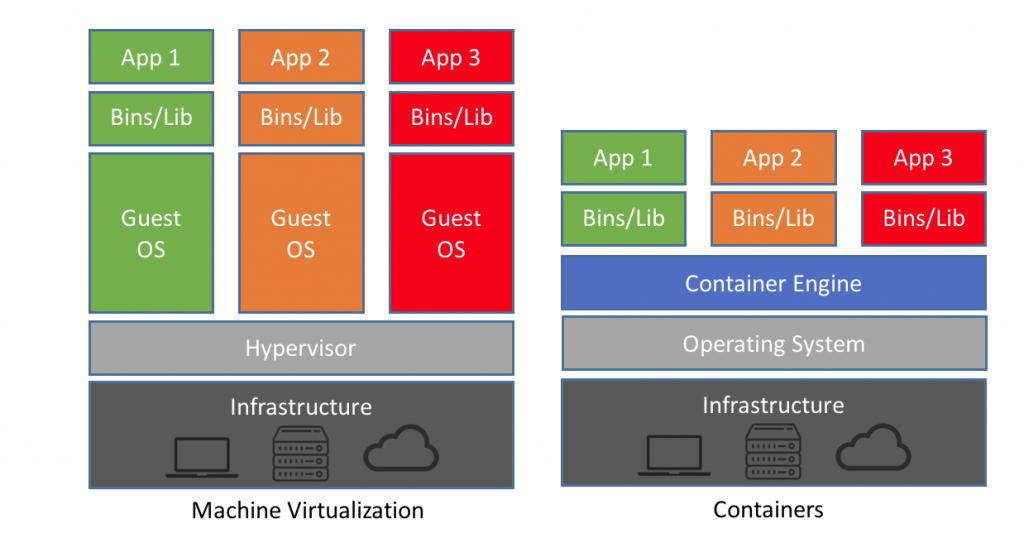
Unlike Hypervisors, Docker will not virtualize and run different OS with different kernels on the same hardware as it is developed to run containers with OS supported by the host OS kernel.

Below are some of the key differences between VMs and Containers :-

  • VMs generally cause high utilization of resources than Containers.
  • Disk space for VMs can be very high which may not even be fully utilized whereas for Containers it will be comparatively less.
  • Bootup time of Containers is comparatively fast.
  • VMs provide complete isolation from host whereas Containers have less isolation as it shares same OS kernel and some common dependencies.

So it can also be said that Containers enable more efficient utilization of resources of the host machine.
Docker Images :-
  • A Docker image is a package or a template which can be used to create one or more containers by using the docker run command.
  • Containers are running instances of images which have their own isolated environments.
  • It is also possible for anyone to create an image of their application and push it to the Docker repository on dockerhub to make it available for themselves as well as the public
  • We will discuss more about it further.
Hands-On Env Setup :-
  • For installation of docker, please refer the official documentation and follow the one that suits your host specifications.
  • My host machine has a Windows OS and so I have used Oracle VirtualBox for setting up an Ubuntu VM.
  • I have given detailed explanation for Oracle VirtualBox in 'Openshift for Beginners : Minishift' section of my blog.

Basic Docker Commands

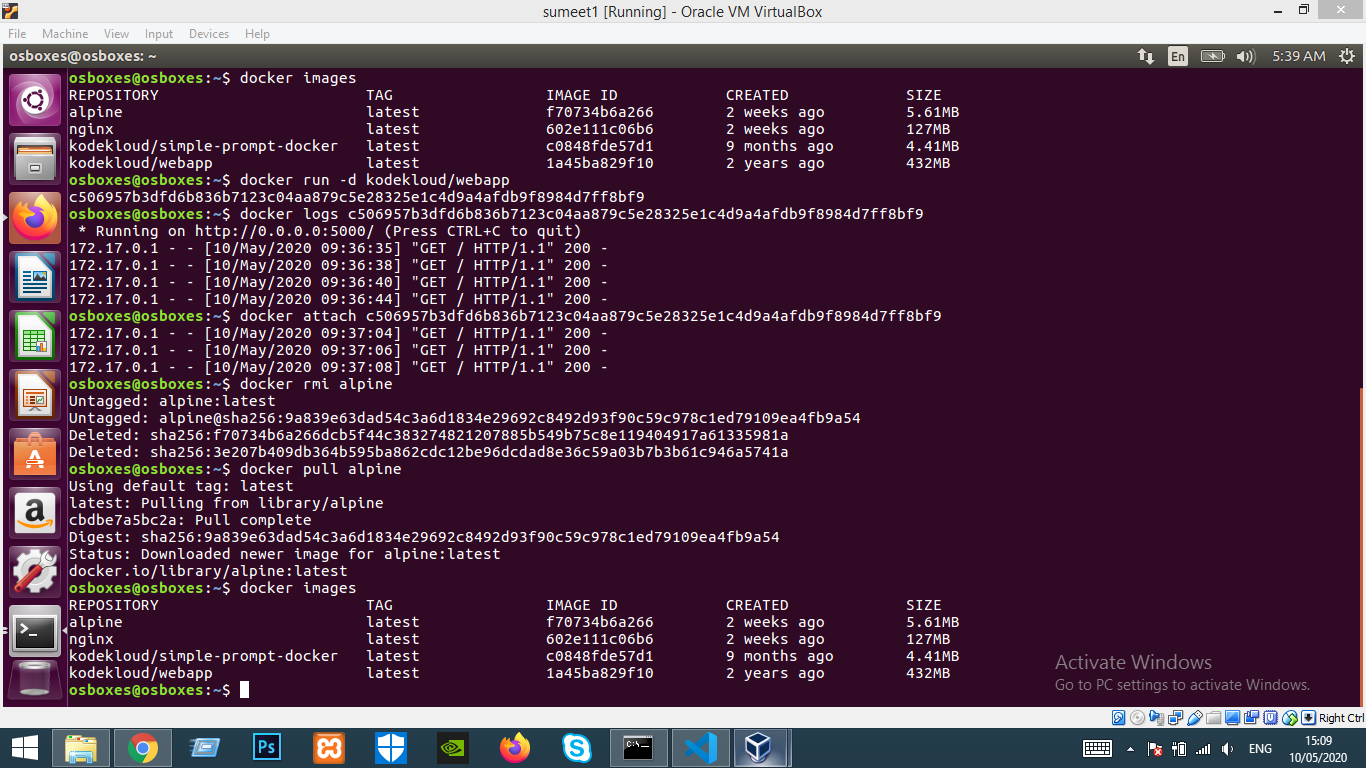
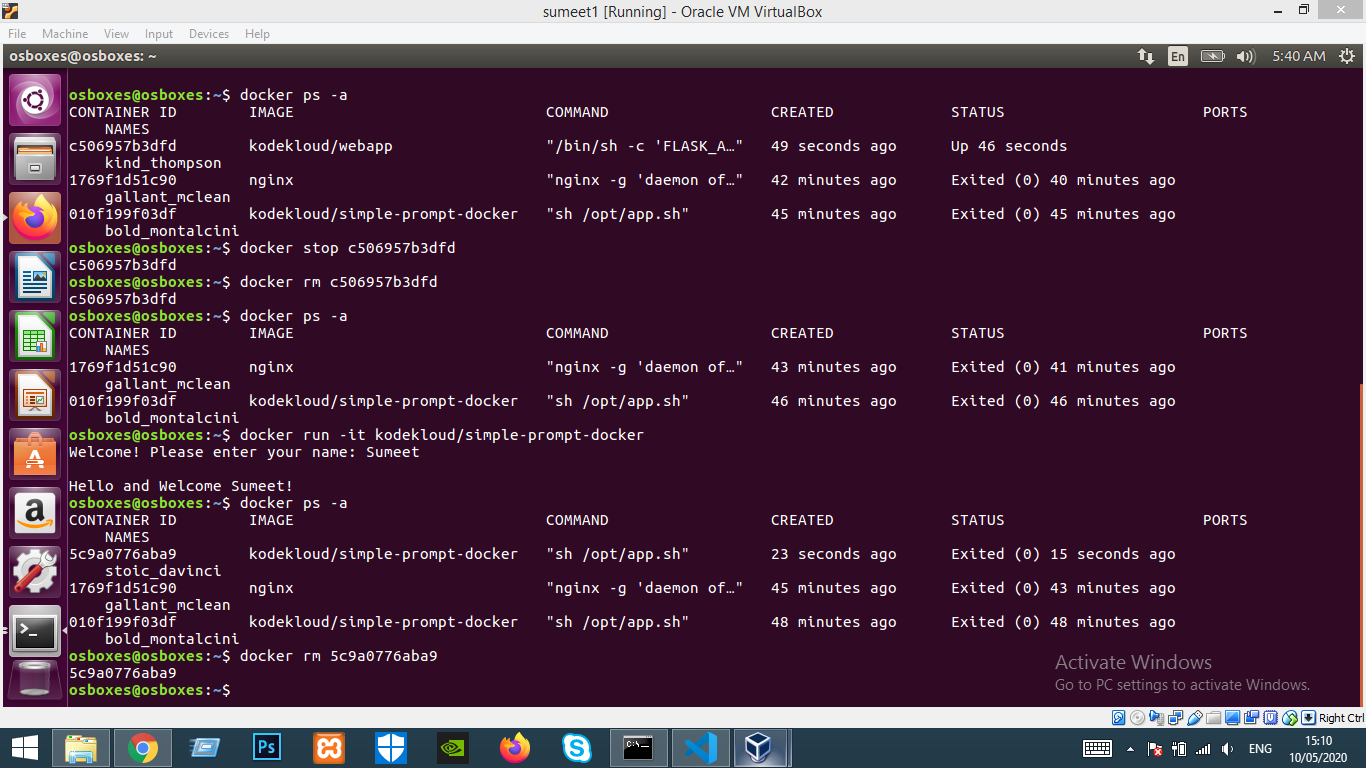
  • Below are some of the basic docker commands, I have also added images for better understanding.
  • In case you are reading on a mobile phone, please tilt for better readability.
Command Description
docker run < image name > This command will create a container for the image name that you have specified.
docker ps
docker ps -a
This will display all running containers.
Adding the '-a' will also display stopped/exited containers.
docker stop < container name/id >
docker rm < container id >
Used to stop/remove a container.
Always stop containers before removing them.
docker images Display a list of all existing images.
docker rmi < image name >
docker pull < image name >
Used to remove an image / pull latest image.
Always stop containers before removing images.
docker run ubuntu sleep 5 Runs an ubuntu image and exits the created container after 5 seconds
docker exec < container name/id > cat /etc/hosts (or any other file name) Display contents from within a container
docker run -d < image name >
docker attach < container id/name >
Run an image in detached mode in background using -d i.e. you wont be able to see the logs or other such data and will be directed back to your command line.
The container can again be attached to display logs/data but you wont be able to type in command line unless you stop the container.
docker logs < container name/id > Display logs for a container for eg. GET POST calls for a webserver, etc.
docker run redis:4.0 Here 4.0 is used as image tag i.e. docker will run image with release version as 4.0. By default i.e. if not specified the tag is latest.
docker run -it < image name > Using -it, we can run the image in interactive terminal mode which is useful to run applications which require cli input.
docker stop $(docker ps -a -q)
docker rm $(docker ps -a -q)
We can use these commands to stop then remove all running containers. '-q' is used to give input of container ids to docker stop/rm command.

Below images will show the implementation of basic docker commands.

Port and Volume mapping

Consider that you have to run an application on docker container, in my case it is a flask application which runs on port 5000. So now the question is that how the users will access my application? Well we have 2 ways to do so :

Use IP of docker container -
  • By default every container gets assigned with an IP address which is an internal one and is only accessible from within the docker host.
  • So now you can access your application by simply opening any web browser and entering your docker container IP and port 5000.
  • You can use the docker inspect command to get all the container related information which also includes the container IP.
osboxes@osboxes:~$ docker run kodekloud/webapp
 * Running on http://0.0.0.0:5000/ (Press CTRL+C to quit)
osboxes@osboxes:~$ docker inspect 0e5028d09b23|grep IPAddress
      "SecondaryIPAddresses": null,
      "IPAddress": "172.17.0.2",
              "IPAddress": "172.17.0.2",
  • Where 0e5028d09b23 is the container id of my application.
  • Now I will just type 172.17.0.2:5000 in my browser to access my application.
  • Now a question arises that how will users outside my docker host access my application?

Use IP of docker host -
  • This is the case where Port Mapping is going to help us.
docker run -p LOCALHOST_PORT:CONTAINER_PORT < image name > 
  • It is possible to run multiple instances of the same application by mapping them on different ports to achieve high availability.
  • However two or more instances cannot be mapped to the same port, attached image will help understand better.
You can see that I have run multiple instances of the same application in detached mode on ports -
  • 80
  • 800
  • 8000
I tried to run same application again on already occupied port 8000 which thus resulted in a port conflict error.

Thus Port Mapping can be beneficial depending upon our use cases.
  • Consider a scenario where you might need all the data that is generated in a container in future even after the container is destroyed.
  • This is a case where Volume Mapping will come into picture.
docker run -v LOCALHOST_FILESYSTEM:CONTAINER_FILESYSTEM < image name >
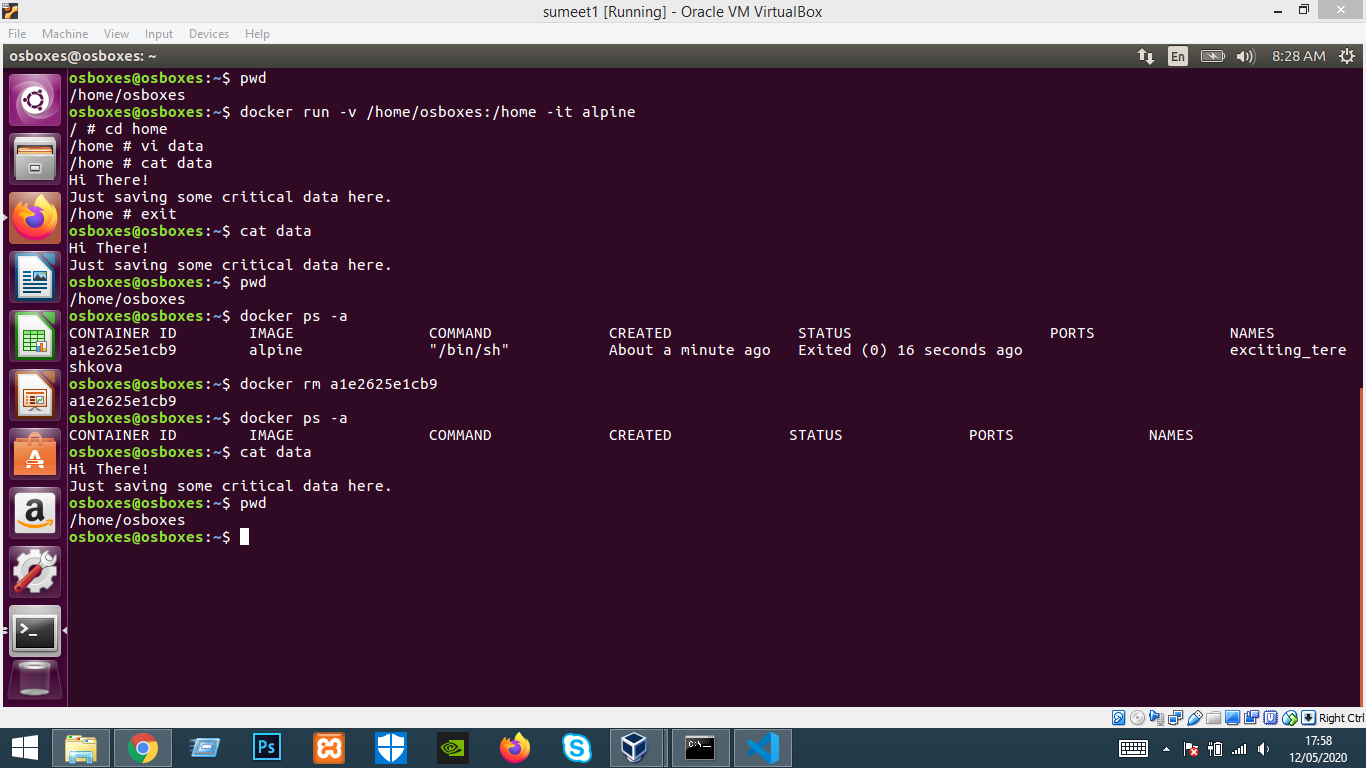
  • Whatever data is stored in a particular container FS will also get stored with the mapped FS on the localhost.
  • Attached image will help understand better.

I had run an alpine image with interactive terminal mode, saved some data in /home Container FS. Later I destroyed the container but I still had the data on my localhost FS /home/osboxes.

Thus Volume Mapping is another such critical functionality.

Docker Images

requirements.txt :-
sumeet@sumeet-Inspiron-3543:~/Flask/weather_app_flask_env$ cat requirements.txt
Flask==0.12.2
requests
We have our dependencies in requirements.txt which we will be installing using pip through our dockerfile.
Dockerfile :-
sumeet@sumeet-Inspiron-3543:~/Flask/weather_app_flask_env$ cat Dockerfile
FROM python:3.6.4-alpine
COPY . /app
WORKDIR /app
RUN pip install -r requirements.txt
EXPOSE 5000
ENV FLASK_APP weather.py
CMD ["flask", "run", "--host=0.0.0.0"]
# FROM python:3.6.4-alpine - We will be using the python-alpine linux distribution as it is very lightweight and sufficient to support our application functionalities.
# COPY . /app - Copy the contents of our working directory to /app directory in the container.
# WORKDIR /app - Switch to /app directory as your working directory.
# RUN pip install -r requirements.txt - Install the dependencies from requirements.txt.
# EXPOSE 5000 - Expose port 5000 of your container for the flask app.
# ENV FLASK_APP weather.py - Specify the source code file name.
# CMD ["flask", "run", "--host=0.0.0.0"] - Run your app. In the context of servers, 0.0.0.0 means all IPv4 addresses on the local machine and you will also avoid some runtime errors by using this parameter.
  • Now we are good to run the docker build command.
  • Make sure that you are in your source code directory before running the command.
  • The tree structure of the directory will be something like I have specified.
weather_app_flask_env
├── Dockerfile
├── requirements.txt
├── templates
│   ├── home.html
│   └── result.html
└── weather.py
  • Run below command to create an image -
    docker build -t sumeetgodse/weather_app_flask_env .
  • Replace my username with your docker username so that you can push that image to your repository later.
  • Now simply run this image and access your application from your browser whenever you want.